How to Draw an Arrow in Photoshop Cc 2018 TUTORIAL
This tutorial shows you how to use the new Curvature Pen Tool in Photoshop CC 2018 to easily draw paths, and how to convert your path outlines into shapes, vector masks and selections. Follow forth with this step-by-step guide.
I of the biggest new features in Photoshop CC 2018 is the new Curvature Pen Tool. The Curvature Pen Tool is a simplified version of Photoshop's standard Pen Tool. Information technology lets us draw complex shapes and paths without the need to edit command handles or recollect keyboard shortcuts. Using the Curvature Pen Tool is equally easy every bit clicking to add points. Photoshop so uses those points to automatically draw your path.
As its proper noun implies, the Curvature Pen Tool draws curved lines by default. Only as we'll meet, information technology's just as easy to describe directly lines, and to switch between curved and straight lines as needed. And like the standard Pen Tool, nosotros can easily convert our path outlines into selection outlines, assuasive anyone, even beginners, to brand make clean, professional selections in Photoshop. Permit's see how information technology works!
The Curvature Pen Tool is but available every bit of Photoshop CC 2018, so you'll demand CC 2018 to follow along. If you're a Creative Cloud subscriber, you tin can learn how to update your copy of Photoshop to CC 2018 using our How To Keep Photoshop CC Up To Date tutorial. Let'southward get started!
Setting Upwards The Certificate
Creating A New Photoshop Document
Rather than me only telling you how the Curvature Pen Tool works, let's set things up so that you can easily follow along with me. We'll get-go by creating a new Photoshop document. Go upwardly to the File carte in the Menu Bar forth the superlative of the screen and choose New:

Going to File > New.
This opens the New Document dialog box. In the Preset Details panel along the correct, prepare both the Width and Height of the new document to 1000 Pixels. Set the Resolution to 72 Pixels/Inch and make sure Groundwork Contents is fix to White. Then, click the Create push in the bottom right corner. A new document, filled with white, volition open on your screen:

Setting the options for the new document in the Preset Details panel.
Setting Upward The Guides
At present that we accept our document, allow's set upwards some guides so it volition be easier for us to draw the aforementioned shapes. Go upwardly to the View card in the Menu Bar and choose New Guide Layout:

Going to View > New Guide Layout.
In the New Guide Layout dialog box, set both the Number of Columns and Number of Rows to 6. Brand sure the Gutter value for both the Columns and Rows is either empty or gear up to 0. If you accept any pre-existing guides that y'all demand to remove, select Clear Existing Guides at the bottom. So, click OK to close the dialog box:

The New Guide Layout options.
You should at present see iii rows and 3 columns of guides in front of your document:

The guides at present appear in the document.
How To Draw With The Curvature Pen Tool
Step ane: Select The Curvature Pen Tool From The Toolbar
With our certificate now set up, let'south learn how to use the new Curvature Pen Tool in Photoshop CC 2018. We select the Curvature Pen Tool from the Toolbar. Past default, the Curvature Pen Tool is nested in behind the standard Pen Tool, so you lot'll demand to click and concur on the Pen Tool'southward icon until a wing-out bill of fare appears. And so, cull the Curvature Pen Tool from the carte du jour:
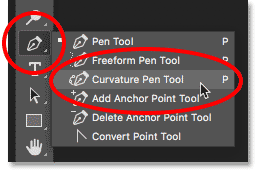
Selecting the Curvature Pen Tool from the Toolbar.
Don't see the Curvature Pen Tool in the Toolbar? Here's where to find information technology.
Step 2: Set The Tool Fashion To "Path" Or "Shape"
Before you begin drawing with the Curvature Pen Tool, choose whether y'all want to draw a path outline or a shape using the Tool Style option in the Options Bar. By default, the Tool Mode is gear up to Path, which is what I'm going to get out information technology set to. If y'all wanted to draw a shape, you would gear up the Tool Mode selection to Shape. I find it's easier just to depict a path because paths are easier to come across equally you lot're drawing, and you tin easily catechumen your path into a shape when you lot're done. We'll acquire how to do that a flake subsequently. For now, leave the Tool Manner set to Path:

The Tool Mode choice can be set up to Path or Shape.
Footstep 3: Click To Add A Starting Point
To brainstorm drawing either a path or a shape, click one time inside your document to set a starting point. I'll click on the spot where the vertical guide in the center and the horizontal guide along the bottom intersect. Notice that a little square appears at the spot where you clicked. This is known as an anchor bespeak because it anchors the position of the path inside the document:

Clicking to add a starting point for the path.
Step 4: Add together A 2d Point To Draw A Straight Line
Next, click to add a second ballast betoken. I'll click where the vertical guide on the left and the horizontal guide in the centre intersect. Notice that fifty-fifty though the tool is named the Curvature Pen Tool, Photoshop draws a straight line, known equally a path segment, between the two points. The reason is that drawing a curve requires three points; one for the start of the bend, i for the end, and one in the centre. The signal in the centre determines the angle, or arc, of the curve. Without that middle point, all Photoshop can draw is a straight line:

Calculation a second point draws a straight line between the two points.
Footstep 5: Add A Third Indicate To Describe A Curve
Click with the Curvature Pen Tool to add together a third point. I'll click where the top horizontal guide and the eye vertical guide intersect. As soon as you click to add the third point, the straight line becomes a curved line:

Calculation a third bespeak converts the direct line into a curve.
Changing The Thickness And Color Of The Path
If y'all're having problem seeing your path outline, you can arrange both the color and thickness of the path past clicking the gear icon in the Options Bar:
![]()
Clicking the gear icon to open the path options.
This opens the Path Options dialog box where you can change the thickness of the path outline from as pocket-size equally 0.5 pixels to equally large as three pixels. You lot can also choose a different color for the path. I'll set the Thickness to 3 px and the Color to Magenta. Note that these settings are there but to help y'all see your path as yous're working. They have no effect on the bodily appearance of the path in the document. To close the Path Options dialog box, click again on the gear icon:

Change the thickness and color of the path in the Path Options.
And now nosotros run across that both the thickness and the color of my path has changed:

The path outline is at present much easier to meet.
Stride 6: Click To Add More Points
To continue drawing your path or shape, simply click to add together more points. By default, once you've started drawing a curved line by adding a third point, any additional points you add will also draw a bend. I'll add a fourth anchor point by clicking where the vertical line along the correct and the horizontal guide in the center intersect. This adds a new path segment between the tertiary and quaternary points and extends the curve:

Adding a 4th betoken to proceed drawing the curved line.
Step vii: Click On The Starting Signal To Shut The Path
To shut your path, click again on your original starting point. We've at present drawn a consummate circle with the Curvature Pen Tool just past clicking:

Close the path by clicking over again on the starting point.
Reshaping The Path Outline
Moving An Existing Anchor Bespeak
We've drawn our path, simply we tin can easily go dorsum at this bespeak and reshape it. In fact, at that place's a few means to do it. Ane is by clicking on an existing anchor point with the Curvature Pen Tool to select it, and so dragging the betoken to a new location. Hither, I'm dragging the top anchor point two vertical guides over to the right:

Clicking and dragging an existing anchor point.
Adding More Ballast Points
We tin can besides add more ballast points to the existing path. To add together a new point, click anywhere forth the path outline. Then, drag the new point to reshape the path. I'll click in the upper left of the path to add a new signal:

Adding a new anchor point by clicking on the path outline.
And then, to reshape the path, I'll drag the new point into the upper left corner where the grid lines intersect:

Dragging the new bespeak to reshape the path.
I'll also click to add a new anchor point at the very top of the path, and and then I'll drag the new signal downward to where the grid lines meet just higher up the center:

Adding a new point at the tiptop and dragging it downward.
Switching Between Curve Points And Corner Points
So far, all of the ballast points nosotros've added with the Curvature Pen Tool accept been bend points (also known as smooth points). That is, the path outline curves as information technology passes through the bespeak. Another way to change the shape of a path is by converting a bend point into a corner point. To switch from a curve point to a corner point, double-click on an existing curve point.
I'll double-click on the bespeak I just added in the top centre, and now we see that, instead of a smooth curve, the path outline abruptly changes direction at that bespeak. To switch from a corner betoken back to a bend point, once again simply double-click on the signal:

Double-click on a curve point to convert it to a corner point, and vice versa.
Deleting A Point
To delete an ballast point, click on information technology with the Curvature Pen Tool to select it, and and so printing the Backspace (Win) / Delete (Mac) key on your keyboard. Here, I've deleted the point in the acme middle, and now the path has returned to the same shape it was in before adding the point:

To delete a point, select it and and then press Backspace (Win) / Delete (Mac).
Deleting An Entire Path
To delete your unabridged path, right-click (Win) / Control-click (Mac) within the document, and then choose Delete Path from the menu. Y'all also delete the entire path by pressing Backspace (Win) / Delete (Mac) on your keyboard when no anchor points are selected:

To delete a path, right-click (Win) / Control-click (Mac) and cull "Delete Path".
I'll delete my path so that I'k back to simply my empty certificate and my guides:
The path has been deleted.
Drawing Straight Path Segments With The Curvature Pen Tool
The main do good of the Curvature Pen Tool is that it's easy to draw curved path outlines. Only nosotros can as well employ information technology to depict direct lines just as easily. We've already seen that we can catechumen a bend indicate into a corner point past double-clicking on it. Just if we know in advance that we demand to draw a straight line, there'south no need to draw a curve indicate start and so convert information technology. Instead, just double-click, rather than single-click, to add the new point. Photoshop will automatically add the point as a corner point.
Let's say we want to draw a rectangular path outline using the Curvature Pen Tool. Start by clicking to set a starting point for the path. I'll click in the lower left corner:

Clicking to set a starting point for the rectangular path outline.
Then, since nosotros know nosotros want the next point to be a corner bespeak, double-click, rather than single-click, to add it. I'll double-click two horizontal guides higher up my starting point:

Double-clicking to add the second point as a corner bespeak.
To add the 3rd indicate to the rectangular shape, I'll once more double-click to add it as a corner point. Find that because we're calculation the points as corner points, Photoshop is connecting them with directly path segments instead of curves:

Double-clicking to add the tertiary point.
I'll add a fourth corner point by double-clicking in the lower right corner. Over again, Photoshop adds some other straight path segment:

Calculation the fourth corner point.
To complete the path, I'll double-click on the initial starting point, and Photoshop adds the remaining straight segment:

Double-clicking on the starting point to close the path.
Converting A Direct Path Segment Into An Curvation
What if, instead of a apartment horizontal line at the top of the path, you want an arch? With the Curvature Pen Tool, information technology'southward easy. All you need to do is click anywhere along the top path segment to add a new anchor point:

Calculation a new point to the elevation of the path.
Then, elevate the new point upward to create the arch:

Dragging the new point upwardly.
Moving Multiple Anchor Points At Once
So far, we've learned that we can move an individual ballast indicate by clicking and dragging it with the Curvature Pen Tool. Simply what if we demand to motion two or more ballast points at once? In that example, nosotros can use Photoshop'due south Straight Choice Tool. You'll find the Direct Pick Tool, also known as the "White Arrow Tool", nested behind the Path Selection Tool (the "Black Arrow Tool") in the Toolbar. Click and concur on the Path Pick Tool until a wing-out bill of fare appears, and then choose the Directly Selection Tool from the menu:

Selecting the Direct Selection Tool from the Toolbar.
Allow'due south say we want to alter the height of our path. We need to select all iii anchor points that make upwardly the superlative (the betoken in the tiptop left, the superlative correct, and the one at the top of the curvation). To select all 3 points at once, click and drag a box around all three points with the Direct Selection Tool:

Dragging with the Direct Selection Tool effectually all three points at the peak.
Then, with all 3 points at the top selected, click on any of them and elevate all iii of them downward together:

Reshaping the path by moving all selected anchor points at the aforementioned time.
To switch dorsum to the Curvature Pen Tool, reselect information technology from the Toolbar:

Reselecting the Curvature Pen Tool.
And and so, to delete the path so we can offset over again, right-click (Win) / Control-click (Mac) inside the document and choose Delete Path from the menu:
Choosing the Delete Path option.
Drawing A Heart With The Curvature Pen Tool
Finally, allow's accept what nosotros've learned nigh curve and corner points and use it to describe a path in the shape of a heart. When we're washed, we'll finish off this tutorial by learning how to turn the path into an actual shape, as well as a vector mask and a selection outline.
Kickoff, click in the bottom center with the Curvature Pen Tool to set your starting signal:

Clicking to set the starting point for the heart.
Then, click in the upper left, where the first vertical guide on the left intersects with the second horizontal guide from the meridian. This adds a 2nd bespeak, and since nosotros only accept 2 points at the moment, Photoshop draws a straight path segment betwixt them:

Clicking to add the second indicate.
To add the tertiary point, click where the height horizontal guide intersects with the second vertical guide from the left. Since this is our tertiary point, Photoshop converts the direct path segment into a bend:

Adding the tertiary point creates the bend.
We need to add our fourth point at the spot where the second horizontal guide from the height meets the vertical guide in the center. Merely, considering we know we need this point to exist a corner point, not a bend betoken, double-click to add it:

Calculation the quaternary bespeak as a corner betoken by double-clicking.
Adjacent, click where the top horizontal guide intersects with the 2nd vertical guide from the right. Fifty-fifty though we're calculation this signal every bit a curve point (past single-clicking), Photoshop will initially draw a straight path segment. That's because our previous point was a corner point:

Single-click to add the 5th ballast point every bit a curve bespeak.
To add together the side by side point, click where the first vertical guide from the right meets the second horizontal guide from the top. Photoshop one time again converts the straight path into a curve:

Adding the sixth point converts the previous straight line into a curve.
Finally, permit'due south close the path and complete our heart shape past clicking on the initial starting point at the lesser. We demand this indicate to exist a corner signal, not a curve, so complete the path by double-clicking on the starting point:

Double-click on the starting point to close the path with a corner signal.
Turning Off The Guides
Nosotros're washed cartoon with the Curvature Pen Tool, then let's remove the guides by going up to the View menu in the Menu Bar, choosing Evidence, and then choosing Guides to deselect them:

Going to View > Evidence > Guides.
This leaves us with just our path:

The heart-shaped path drawn with the Curvature Pen Tool.
Converting The Path Into A Pick, Mask Or Shape
At present that nosotros've fatigued our path, Photoshop makes it piece of cake to catechumen the path into either a choice outline, a vector mask or a shape. With the Curvature Pen Tool however agile, you lot'll find all three options in the Options Bar. Simply choose the one y'all need:

Employ the Make option to turn the path into a option, vector mask or shape.
Choice Outline
To convert your path into a selection outline, choose Selection:

Choosing "Pick" from the Options Bar.
Photoshop will open the Brand Selection dialog box. Here, you lot can add some feathering to the selection if needed, or merely click OK to close the dialog box:

The Make Selection dialog box.
Photoshop instantly converts your path outline into a "marching ants" option outline:

The path drawn with the Curvature Pen Tool is now a option outline.
I'll disengage it so nosotros tin can look at the other two options by going up to the Edit carte du jour and choosing Disengage Choice Change. I could as well but press Ctrl+Z (Win) / Command+Z (Mac) on my keyboard:

Going to Edit > Undo Selection Change.
Vector Mask
To create a vector mask from your path outline, cull Mask in the Options Bar:

Clicking the "Mask" option.
Photoshop converts the path into a vector mask, with only the surface area inside the path remaining visible in the certificate. The checkerboard design at present surrounding the path represents transparency, since we have no other layers below the mask:

The path now appears as a vector mask, with only the area inside the path visible.
And if nosotros look in the Layers console, nosotros now see a vector mask thumbnail:

A vector mask thumbnail appears in the Layers panel.
I'll undo the vector mask so we can expect at the third option by going upwards to the Edit bill of fare and choosing Undo Add Vector Mask. Or again, I could but press Ctrl+Z (Win) / Control+Z (Mac) on my keyboard:

Going to Edit > Undo Add Vector Mask.
Shape Layer
Finally, to convert a path fatigued with the Curvature Pen Tool into a Shape layer, cull Shape:

Choosing "Shape" from the Options Bar.
Photoshop fills the new shape with your current Foreground colour, which in my case is black:

The path now converted into a shape.
If we look again in the Layers panel, we at present run into a new Shape layer. To change the shape's colour, double-click on the shape's thumbnail:

Double-clicking the Shape layer thumbnail to alter the shape color.
Then choose a new color from the Color Picker. Since nosotros've fatigued a eye shape, I'll cull a shade of red. Click OK when you're done to close the Color Picker:

Choosing a different color for the shape from the Color Picker.
Finally, to hide the path outline from effectually the shape, press Enter (Win) / Return (Mac) on your keyboard. Or, just choose a different tool from the Toolbar. Here'due south my centre shape at present filled with crimson:

The red centre shape drawn with the Curvature Pen Tool.
And there nosotros take it! That'southward our stride-past-footstep guide to drawing paths and shapes with the new Curvature Pen Tool in Photoshop CC 2018! Also check out the new Rich Tool Tips in Photoshop CC 2018. Visit our Photoshop Nuts section for similar tutorials!
DOWNLOAD HERE
How to Draw an Arrow in Photoshop Cc 2018 TUTORIAL
Posted by: maevirsexpon.blogspot.com


Kommentare
Kommentar veröffentlichen